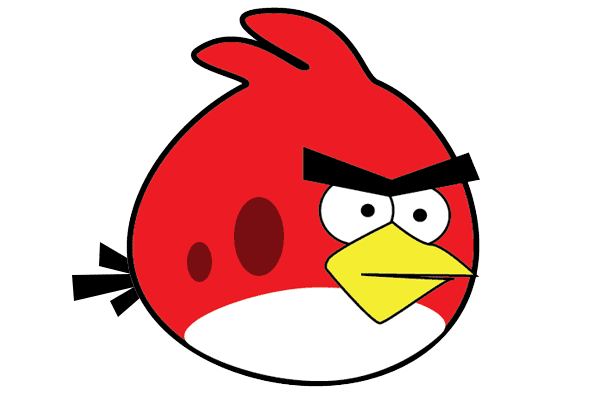
Create your own Angry Bird
 |
| Which Angry Bird will you create? |
Following the release of the Angry Birds Movie we thought it might be fun to practice our graphic design skills and make our very own Angry Bird. This tutorial is completed in Illustrator but all the tools and techniques used are also available in Photoshop. The reason I am using Illustrator is that Illustrator is the best program for creating vector graphics using the pen tool. Logos and cartoons are normally made with the pen tool so they are created as vector graphics, allowing them to be resized up or down without loss of quality, therefore this image will be created using the pen tool. If you are not familiar with the pen tool then you can read this guide to using the pen tool before you start.
Now that that is cleared up, let's begin making an Angry Bird!
1. Go to File-> New and create a canvas 700px wide and 500px tall.
2. Go to the layers window and rename the base layer 'Body'. Select the ellipse shape tool and create a circle, set the colour of the circle to red, as we'll be creating the red Angry Bird, and put a 7px black stroke on the circle.
3. Use the direct selection tool to move the top and left anchor points slightly, as seen in the image below.
 |
| The Angry Bird's Body |
4. Now use the add anchor point tool (within the pen tool) to add 6 anchor points across the top of the body, don’t be too particular about the placement as we will be moving them soon anyway. See the image below.
5. Next select the direct selection tool and drag the 2nd and 4th anchor points upwards and the use the handles on each anchor point until the shape resembles the image below. (If there are no handles on the anchor points it is possible they are straight line anchor points, use the convert anchor point tool and click and drag slightly on each point to convert them to curved line anchor points.)
 |
| The infamous 'quiff' of the red angry bird |
6. Now open the layers window and click the button circled in the image below and create a new layer, call it 'belly'.
7. Next, while on the belly layer, use the ellipse shape tool to create the rough shape of the belly, colour the shape in white and set the stroke to 0pt. Then zoom in and use the direct selection tool to move the anchor points and their handles into a shape similar to the image below.
9. Next create a new layer, call it 'eyeballs'. Use the ellipse tool to create two small black circles without any stroke. Position the eyeballs as shown in the image below.
10. Again create a new layer, call it 'eyebrow' and ensure it is the top layer. Use the Pen tool and click (do not click and drag) one at a time creating new straight line anchor points in the shape shown below remembering to join the last anchor point to the original point.
 |
| Getting the mono-brow right is the key to making him look angry |
 |
| The angry bird and the layers used so far |
12. Finally, create one more layer - call it "tail" and again use the pen tool to create straight line anchor points to make up the tail shape. Position the layer beneath the body layer for best results. If you wish you can use the ellipse shape to create 2 more shapes for the 'freckles' , or whatever they are, on the body.
 |
| The completed angry bird |
TIP: The pen tool can be difficult but remember practice makes perfect so after completing this tutorial perhaps try creating the rest of the angry bird family or other cartoon images.
Create your own Angry Bird
 Reviewed by Opus Web Design
on
June 08, 2016
Rating:
 Reviewed by Opus Web Design
on
June 08, 2016
Rating:


