UE4 Terrain and Landscape full tutorial
 |
| Our end result. |
In this tutorial I will be showing you how to make a good landscape for your game in UE4.
Creating the landscape(terrain)
You can either use the level that you start with and create your landscape there or create a new level if you wanted. To add a new level go to "contents browser" and then "add new" and choose a "new level."
 |
| Making a new level. |
select the level you are working on and in modes menu select the landscape and your view port in unreal engine should look like this.
 |
| creating a new landscape |
In the modes panel you can select the landscape mode and then change the setting to the following and then select create. (15 x 15 quads is well big enough for your first level.)
 |
| Landscape settings |
 |
| Editing the landscape (Terrain) |
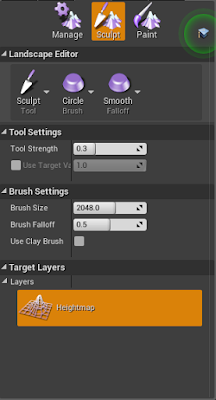
when you have created your landscape is crated the following options menu/panel should appear under "landscape mode"
 |
| This is where you edit the landscape using brushes under three menus |
This is where you edit the landscape using brushes under three menus you can edit your landscape through the three edit modes. the three modes are:
1. manage mode
2. sculpt mode
3. paint mode (used to apply textures to landscape)
Manage mode- through this mode you can create new landscapes, modify an existing landscape by selecting components (building blocks/ grids of landscapes) and modify their properties in the level editors details panel. there are a few tools within this section.e

Selection tool- this tool selects a section or block of the landscape.

Add tool- this tool adds a selection or block of landscape to the already existing landscape and can add different amounts of sections depending on brush size.

Delete tool- this tool allows you to remove or delete sections of landscape and is basically the opposite of the add tool.

Move level- Moves any selected components to a specific streaming level.

Change component size- changes the size of components and the size of the landscape according to the settings.

Edit splines- ctrl + left click on the landscape will place a node for a spline. if a node is selected and there is another node placed, this will connect the two nodes and if there are no nodes selected then a new node will be placed.
Selection Tool
 |
| Selected blocks are shaded orange. |
Add Tool
 |
| Green area is where you will add the next block. |
Delete Tool
 |
| The white areas are areas that have been deleted. |
Change Component Size Tool
 |
| These options allow you to change the component size of your landscape |
Edit Spline Tool

Sculpt mode:
allows you to mold the look of your landscape height map.

1.Sculpting tools - sculpts the landscape with various tools.
2. Brush tools - changes the appearance and effect of the brush that is used when you are either painting or sculpting the landscape.
3. Falloff tools - modifies how your brushes falloff.

1.Sculpting tools - sculpts the landscape with various tools.
2. Brush tools - changes the appearance and effect of the brush that is used when you are either painting or sculpting the landscape.
3. Falloff tools - modifies how your brushes falloff.
Sculpt Tools
 |
| Left mouse click to raise the landscape |
 |
| Hold shift and left mouse click to lower the landscape |
Smooth Tool

 |
| Smooths out the rough areas of the landscape to the original height of the landscape. |
Flatten Tool

 |
| The flatten tool raises and lowers the landscape to the height of the area you are using it on. |
Ramp Tool

 |
| The ramp tool works by having a base point and then a height point placed on a raised landscape,select add ramp to add a ramp to the landscape. |
Erosion Tool

 |
| This tool adjusts the height of the landscape by appearing to transfer the soil from high levels to lower levels. |
Hydro Erosion Tool

 |
| This tool works the same way as the erosion tool only instead of soil it is meant to look like water erosion. |
Noise Tool

 |
| The noise tool applies a noise filter to the landscape and determines where soil and water where distributed for the erosion and hydro erosion tools. |

Retopologize Tool
Similar to the smooth tool but it pushes and pulls triangles to smooth the transition of the landscape and try and keep the basic form of the terrain which minimizes change to the height of the landscape. This tool makes the project slower to render and should only be used if really needed.

Visibility Tool
Used to create holes in the landscape for things such as caves. For this tool to be visual, the landscape must have a material/texture on it. This tool will be covered in more detail in our ‘Textures and Materials’ tutorial.
Region Tools


Brush Tools
Circle Brush Tool
 |
| Plain circle brush can be used with all the sculpting tools and the size,strength and falloff can be changed. |
Alpha Brush Tool

 |
| Creates a mask image with the brush stroke. |
Pattern Brush

 |
| Creates a mask that can repeat across the landscape or terrain and rises and lowers the selected areas. |
Component Brush

 |
| Moves selected components up or down and the size of the brush depends on the number of components selected. |
Falloff Tools
Smooth Falloff

 |
| Falloff with a balanced speed that creates an almost cylinder shape. |
Linear Tool

 |
| Falloff is constant. |
Spherical Falloff

 |
| Starts off slow and then finishes quickly as it comes to the edge of the brush. |
Tip Falloff Tool

 |
| Falloff drops quickly. |
UE4 Terrain and Landscape full tutorial
 Reviewed by reece o reilly
on
January 25, 2019
Rating:
 Reviewed by reece o reilly
on
January 25, 2019
Rating:


