My First 2D Game in UE4: Platforms and Scalable materials
In this tutorial we are going to start blocking out our
level. For this step I would advise you to have the sketches of your level
mapping ready. Do not improvise. Things can get really messy and you will end wasting
a lot of time if you don’t have taken the necessary time to get your idea for
the game conveniently design. Check the
steps of the Game Design Process if you haven’t done it yet.
To create the platforms for our game, we will develop
further our knowledge about Sprites and start covering other aspects such as
Levels and Materials.
With the sketches of your level design you should also have
ready the textures that you are going to use for your game to import into the
engine. Check the article How To Create A Tileable Texture if you don’t know
yet how to do it.
Maps and Levels
In our Content Browser lets jump to the folder Maps. In this
folder we are going to store all our levels. Our game can have multiple levels
or just only one and these can vary in size and content. We are going to change
the name of the existing level to Level1 just by right clicking on it and choosing
the option Rename.
 |
| Maps Folder |
We can create as many levels as we need for our game. To create a level just unfold the menu by right clicking in an empty space in the content browser and choosing the option level. Now you can switch between levels double-clicking on them and notice that when you do it, Level2 is empty in your viewport and in your world outliner. If you ever open your engine and everything is empty, make sure before you panic you are in the correct level.
To make sure that our engine and game opens in our chosen
level we are going to arrange this in the Setting tab in the Toolbar above your Viewport.
 |
| Tool Bar |
The Settings tab will unfold a menu where we will choose Project Settings (second from the top)
 |
| Project Settings |
Project Settings will launch a new window with all the project settings menu, and there we will choose in the left side of the screen, under Project, the Maps and Modes option.
 |
| Project: Maps and Modes |
In the Default Maps we will tell the engine where to open
our Game and where to open the Editor. We have not built yet any user interface
but normally our game should start in our Menu, and the editor in the level
that we are building. So, we are going to make sure, for now, that everything
opens in our Level1 and close this window.
Simple platform
Now we are going to star blocking out our level. The simplest
platform that we can create is a simple sprite that has a fixed position in our
level. We are going open our Texture folder in the Content Browser and Import
our textures for the Platforms (Remember: Seamless texture, .png or .tga and power off two).
Now create a sprite with your imported texture and drag it
to your sprites folder (Right click on the texture>sprite actions>
create sprite).
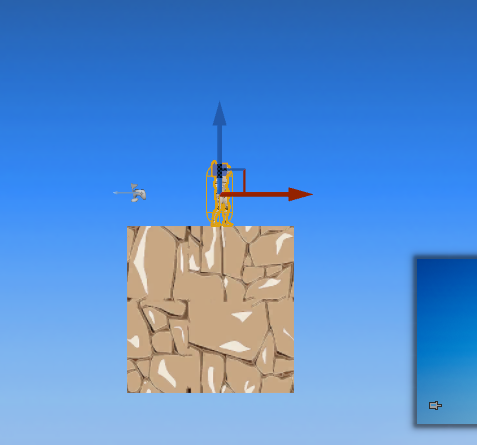
We can drag now the sprite to our viewport under the character
to have him standing there. Make sure in your details panel that the sprite
location value on the Y axis is 0 to interact with you character.
 |
Dragging a sprite for a platform
|
My texture is 512X512
px large and I think is looking to big under my character. There is few ways to
scale this.
- · We can press twice our space bar to toggle between tools to get our scale option and scale the platform manually
- · We can modify the values in the Details panel
- · We can press in our keyboard the R key to toggle between tools
- · We can open our sprite window double-clicking on the sprite to change the Pixels Per Unit
This last option is my personal preference because it affects
the sprite in the content browser not only in the viewport so I will not have
to scale it every time that I drag the sprite to the viewport. If I modify the Pixels
Per Unit to 2.56 (closest power of 2 value) the size of my platform will be
considerably smaller, but I am still not happy with the way this platform looks.
I want it to be half in height (Z axis) and double in length (X axis). So, let’s
try to scale this in the Details Panel (Scale 2 in the X and 0.5 in the Z).
 |
Stretched texture
|
Now, if we compare with the original texture it seams like
the pattern has been stretched. We are going to fix this in our next section.
Materials
With the sprite (platform) selected in the Viewport lets
focus on the Details panel.
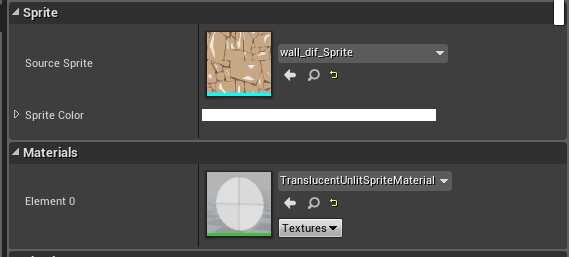
Under the Sprite
section it is the Materials section
 |
| Material section in the Details Panel |
In the way it is right now our sprite is using a default
material that has not the capacity to scale in a proportional way depending of
the position that occupies in the world.
We are going to create a new material that will scale
without stretching the texture of our platforms.
For this, in the content browser go to your material folder
and in an empty space right click and select material
I am going to name mine as Platform-M
 |
| Naming the Material |
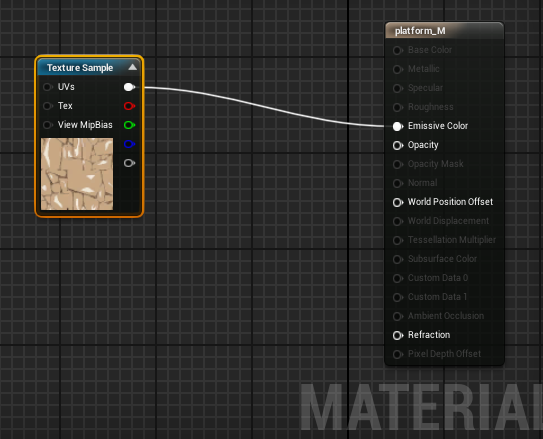
Now, if we double-click in the new material, we will open the graph to do our own coding. Make this new window smaller to give yourself space to drag into the graph the texture sample, and from your texture folder just drag the texture to the graph.
 |
| Material Graph |
From the white node of your texture sample drag out and connect to the emissive colour.
 |
| Connecting the Texture Sample |
Right-click in an empty space and type world position and
choose this option from the menu.
 |
| Absolute World Position |
From the node in the world position drag and type component mask
 |
| Component Mask |
Click in the mask new component to open its Details panel in the left side of your screen. Under the Material Expression Component Mask, we are going to unclick G and click B. This is because they are equivalent to our axis for our 2D game, so to use the X, Z axis we use the R, B masks. Drag the node and type Multiply. Selected and connect this to the Texture Sample
 |
| Multiply |
Now we need a Scalar Parameter. Right-click in an empty space, type Scalar and selected and name this Scalar, RepeatsPerMeter.
 |
| Repeats per Meter |
From the RepeatsPerMeter now we must pull the node out and type divide, and to this parameter we have to connect a constant.
 |
| Constant |
In the details panel with the constant selected we give to it a value. I will give to mine 100. And to the RepeatsPerMeter parameter we are going to give a default value greater than 0.
 |
| Details Panel |
Apply and Save your new material.
 |
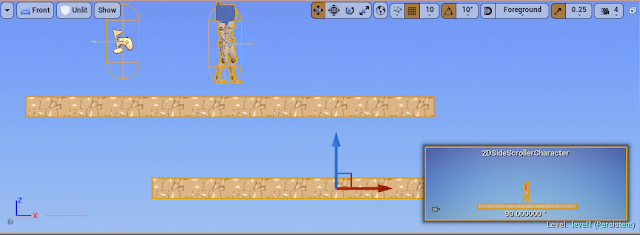
| Properly Scaled Platforms |
Now you can safely scale your platforms without stretching the pattern if you apply this material to them. To apply the material, you can do it by opening the sprite menu and this will be effective permanently for every time that you drag this sprite in the viewport.
 |
| Sprite Details Panel |
Or you can drag first the sprite to the viewport and then drag the material on the sprite in the viewport and this will only affect to that sprite in the viewport.
Every platform that you position in your viewport has to be
above the Kill Z. Anything that happens below that line will stop the game. The
kill Z is, in your viewport, from the two red lines the brighter one. The other one
is your X axis.
In the next tutorial we will learn how to build Lift Platforms,
talk about Blueprints, Graph Events and Functions.
My First 2D Game in UE4: Platforms and Scalable materials
 Reviewed by Maria Cereijo
on
March 11, 2019
Rating:
 Reviewed by Maria Cereijo
on
March 11, 2019
Rating:


